Jenkins Scripted Pipeline - Create Jenkins Pipeline for Automating Builds, Code quality checks, Deployments to Tomcat - How to build, deploy WARs using Jenkins Pipeline - Build pipelines integrate with Bitbucket, Sonarqube, Slack, JaCoCo, Nexus, Tomcat
What are Pipelines in Jenkins?

Pre-requistes:

- Pipelines are better than freestyle jobs, you can write a lot of complex tasks using pipelines when compared to Freestyle jobs.
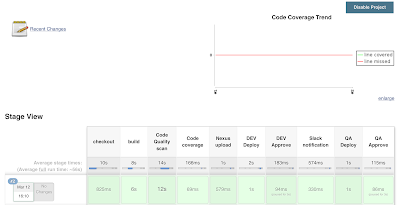
- You can see how long each stage takes time to execute so you have more control compared to freestyle.
- Pipeline is groovy based script that have set of plug-ins integrated for automating the builds, deployment and test execution.
- Pipeline defines your entire build process, which typically includes stages for building an application, testing it and then delivering it. - You can use snippet generator to generate pipeline code for the stages you don't know how to write groovy code.
- Pipelines are two types - Scripted pipeline and Declarative pipeline. Click here to know the difference between them.
Pre-requistes:
Install plug-ins
1. Install Deploy to container, Slack, Jacoco, Nexus Artifact Uploader and SonarQube plug-ins (if already installed, you can skip it)
Steps to Create Scripted Pipeline in Jenkins
1. Login to Jenkins
2. Create a New item
3. Give name as MyfirstPipelineJob and choose pipeline
4. Click ok. Pipeline is created now
5. Under build triggers, click on poll SCM, schedule as
H/02 * * * *
6. Go to Pipeline definition section, click on Pipeline syntax link. under sample step drop down, choose checkout: Checkout from version control. enter bitbucket or GitHub Repository URL, and enter right credentials. Click here to learn to use PSA if you are using GitHub. scroll down, click on Generate Pipeline script. Copy the code.
7. Now copy the below pipeline code highlighted section into Pipeline section in the pipeline. Please copy stage by stage
8. Change Maven3, SonarQube variables and also Slack channel name as highlighted above in red as per your settings.
9. For Nexus Upload stage, You need to change the Nexus URL and credentials ID for Nexus (which you can grab from Credentials tab after login)
10. For Dev Deploy stage, you can copy credentials ID used for connecting to Tomcat.
Pipeline Code:
node {
def mvnHome = tool 'Maven3'
stage ("checkout") {
copy code here which you generated from step #6
}
stage ('build') {
sh "${mvnHome}/bin/mvn clean install -f MyWebApp/pom.xml"
}
stage ('Code Quality scan') {
withSonarQubeEnv('SonarQube') {
sh "${mvnHome}/bin/mvn -f MyWebApp/pom.xml sonar:sonar"
}
}
stage ('Code coverage') {
jacoco()
}
stage ('Nexus upload') {
nexusArtifactUploader(
nexusVersion: 'nexus3',
protocol: 'http',
nexusUrl: 'nexus_url:8081',
groupId: 'myGroupId',
version: '1.0-SNAPSHOT',
repository: 'maven-snapshots',
credentialsId: '2c293828-9509-49b4-a6e7-77f3ceae7b39',
artifacts: [
[artifactId: 'MyWebApp',
classifier: '',
file: 'MyWebApp/target/MyWebApp.war',
type: 'war']
]
)
}
stage ('DEV Deploy') {
echo "deploying to DEV Env "
deploy adapters: [tomcat9(credentialsId: '4c55fae1-a02d-4b82-ba34-d262176eeb46', path: '', url: 'http://your_tomcat_url:8080')], contextPath: null, war: '**/*.war'
}
stage ('Slack notification') {
slackSend(channel:'channel-name', message: "Job is successful, here is the info - Job '${env.JOB_NAME} [${env.BUILD_NUMBER}]' (${env.BUILD_URL})")
}
stage ('DEV Approve') {
echo "Taking approval from Manager for QA Deploy"
timeout(time: 7, unit: 'DAYS') {
input message: 'Do you approve to deploy into QA environment?', submitter: 'admin'
}
}
stage ('QA Deploy') {
echo "deploying into QA Env "
deploy adapters: [tomcat9(credentialsId: '4c55fae1-a02d-4b82-ba34-d262176eeb46', path: '', url: 'http://your_tomcat_url:8080')], contextPath: null, war: '**/*.war'
}
stage ('QA Approve') {
echo "Taking approval from QA manager"
timeout(time: 7, unit: 'DAYS') {
input message: 'Do you want to proceed to PROD Deploy?', submitter: 'admin,manager_userid'
}
}
stage ('PROD Deploy') {
echo "deploying into PROD Env "
deploy adapters: [tomcat9(credentialsId: '4c55fae1-a02d-4b82-ba34-d262176eeb46', path: '', url: 'http://your_tomcat_url:8080')], contextPath: null, war: '**/*.war'
}
}
11. Click Apply, Save
echo "deploying into PROD Env "
deploy adapters: [tomcat9(credentialsId: '4c55fae1-a02d-4b82-ba34-d262176eeb46', path: '', url: 'http://your_tomcat_url:8080')], contextPath: null, war: '**/*.war'
}
}
11. Click Apply, Save
12. Now click on Build. It should execute all the stages and show pipeline view like this.


No comments:
Post a Comment