What is Git?
Git is a free, open source distributed version control system tool designed to handle everything from small to very large projects with speed and efficiency. It was created by Linus Torvalds in 2005 to develop Linux Kernel. Git has the functionality, performance, security, and flexibility that most teams and individual developers need. It also serves as an important distributed version-control DevOps Tools This ‘What Is Git’ blog is the first blog of my Git Tutorial series. I hope you will enjoy it. :-)
In this ‘What is Git’ blog, you will learn:
What is Git – Why Git Came Into Existence?
We all know “Necessity is the mother of all inventions”. And similarly, Git was also invented to fulfill certain necessities that the developers faced before Git.
What is the purpose of Git?
Git is primarily used to manage your project, comprising a set of code/text files that may change.
But before we go further, let us take a step back to learn all about Version Control Systems (VCS) and how Git came into existence.
Version Control is the management of changes to documents, computer programs, large websites and other collection of information.
There are two types of VCS:
- Centralized Version Control System (CVCS)
- Distributed Version Control System (DVCS)
Centralized VCS
Centralized version control system (CVCS) uses a central server to store all files and enables team collaboration. It works on a single repository to which users can directly access a central server.
Please refer to the diagram below to get a better idea of CVCS:
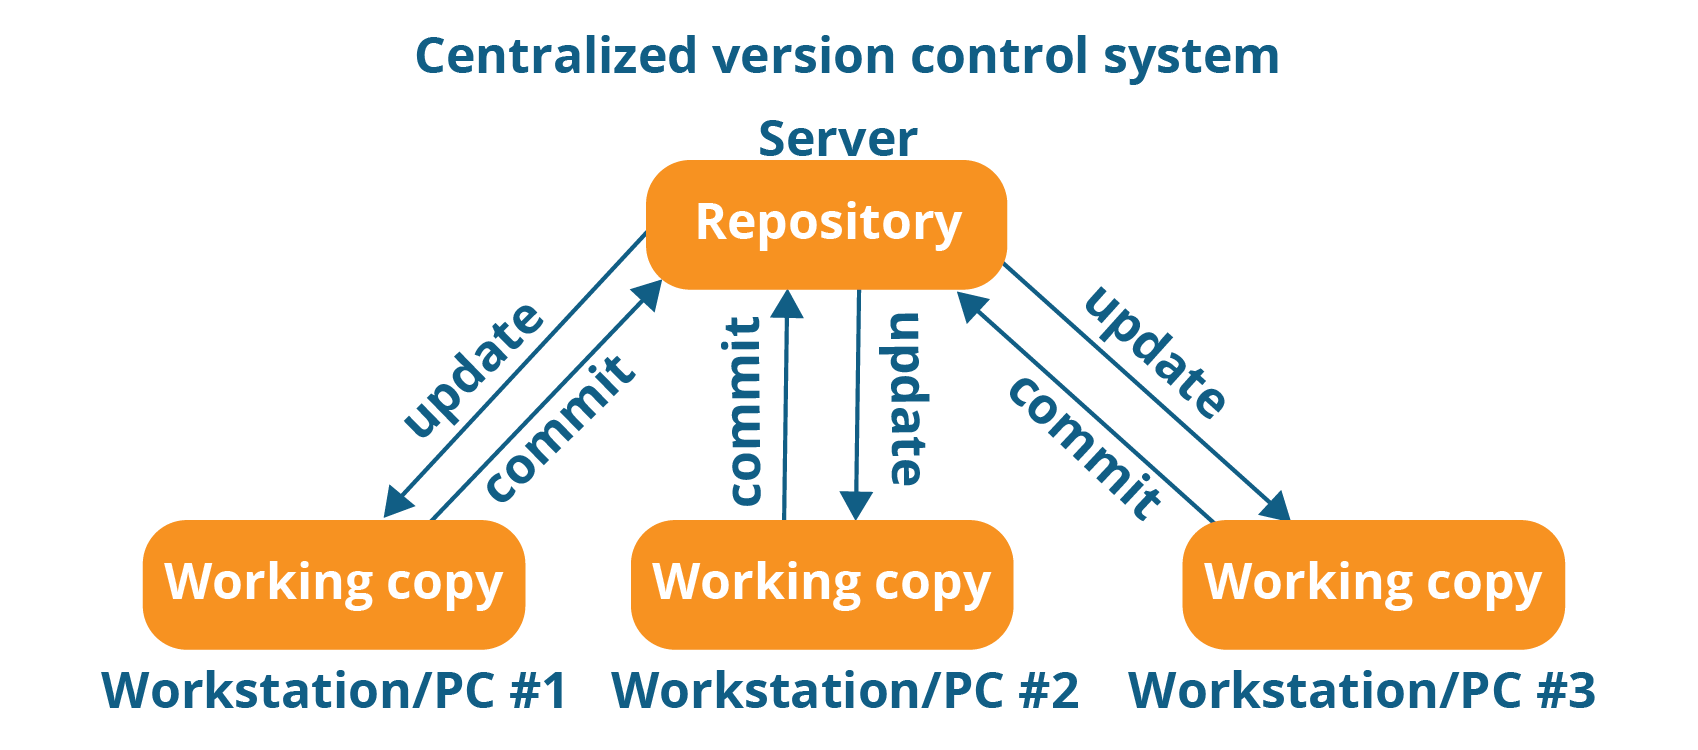
The repository in the above diagram indicates a central server that could be local or remote which is directly connected to each of the programmer’s workstation.
Every programmer can extract or update their workstations with the data present in the repository or can make changes to the data or commit in the repository. Every operation is performed directly on the repository.
Even though it seems pretty convenient to maintain a single repository, it has some major drawbacks. Some of them are:
- It is not locally available; meaning you always need to be connected to a network to perform any action.
- Since everything is centralized, in any case of the central server getting crashed or corrupted will result in losing the entire data of the project.
This is when Distributed VCS comes to the rescue.
Distributed VCS
These systems do not necessarily rely on a central server to store all the versions of a project file.
In Distributed VCS, every contributor has a local copy or “clone” of the main repository i.e. everyone maintains a local repository of their own which contains all the files and metadata present in the main repository.
You will understand it better by referring to the diagram below:
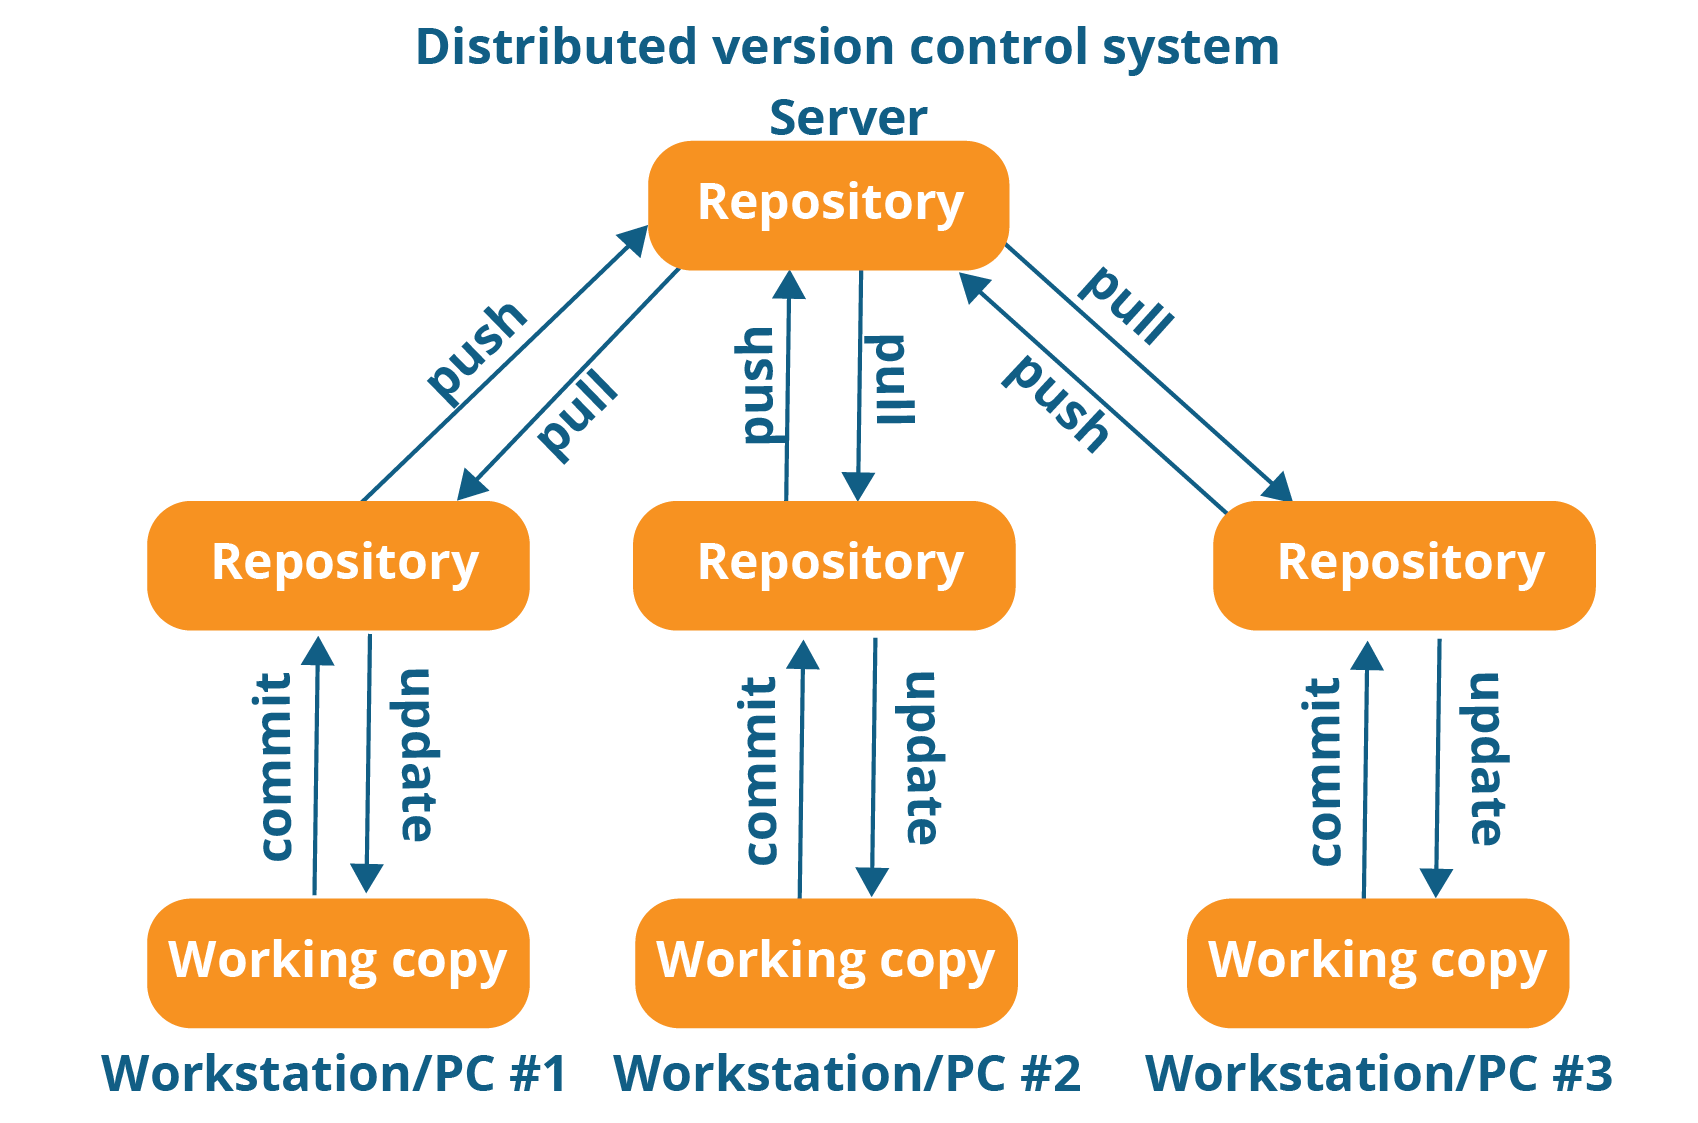
As you can see in the above diagram, every programmer maintains a local repository on its own, which is actually the copy or clone of the central repository on their hard drive. They can commit and update their local repository without any interference.
They can update their local repositories with new data from the central server by an operation called “pull” and affect changes to the main repository by an operation called “push” from their local repository.
The act of cloning an entire repository into your workstation to get a local repository gives you the following advantages:
After knowing Distributed VCS, its time we take a dive into what is Git.All operations (except push & pull) are very fast because the tool only needs to access the hard drive, not a remote server. Hence, you do not always need an internet connection.- Committing new change-sets can be done locally without manipulating the data on the main repository. Once you have a group of change-sets ready, you can push them all at once.
- Since every contributor has a full copy of the project repository, they can share changes with one another if they want to get some feedback before affecting changes in the main repository.
- If the central server gets crashed at any point of time, the lost data can be easily recovered from any one of the contributor’s local repositories.
What Is Git?
Git is a Distributed Version Control tool that supports distributed non-linear workflows by providing data assurance for developing quality software. Before you go ahead, check out this video on GIT which will give you better in-sight.
Git provides with all the Distributed VCS facilities to the user that was mentioned earlier. Git repositories are very easy to find and access. You will know how flexible and compatible Git is with your system when you go through the features mentioned below:
What is Git – Features Of Git
![]()
Free and open source:
Git is released under GPL’s (General Public License) open source license. You don’t need to purchase Git. It is absolutely free. And since it is open source, you can modify the source code as per your requirement.
![]()
Speed:
Since you do not have to connect to any network for performing all operations, it completes all the tasks really fast. Performance tests done by Mozilla showed it was an order of magnitude faster than other version control systems. Fetching version history from a locally stored repository can be one hundred times faster than fetching it from the remote server. The core part of Git is written in C, which avoids runtime overheads associated with other high level languages.
![]()
Scalable:
Git is very scalable. So, if in future , the number of collaborators increase Git can easily handle this change. Though Git represents an entire repository, the data stored on the client’s side is very small as Git compresses all the huge data through a lossless compression technique.
![]()
Reliable:
Since every contributor has its own local repository, on the events of a system crash, the lost data can be recovered from any of the local repositories. You will always have a backup of all your files.
![]() Secure:
Secure:
Git uses the SHA1 (Secure Hash Function) to name and identify objects within its repository. Every file and commit is check-summed and retrieved by its checksum at the time of checkout. The Git history is stored in such a way that the ID of a particular version (a commit in Git terms) depends upon the complete development history leading up to that commit. Once it is published, it is not possible to change the old versions without it being noticed.
![]() Economical:
Economical:
In case of CVCS, the central server needs to be powerful enough to serve requests of the entire team. For smaller teams, it is not an issue, but as the team size grows, the hardware limitations of the server can be a performance bottleneck. In case of DVCS, developers don’t interact with the server unless they need to push or pull changes. All the heavy lifting happens on the client side, so the server hardware can be very simple indeed.
![]() Supports non-linear development:
Supports non-linear development:
Git supports rapid branching and merging, and includes specific tools for visualizing and navigating a non-linear development history. A core assumption in Git is that a change will be merged more often than it is written, as it is passed around various reviewers. Branches in Git are very lightweight. A branch in Git is only a reference to a single commit. With its parental commits, the full branch structure can be constructed.
![]() Easy Branching:
Easy Branching:
Branch management with Git is very simple. It takes only few seconds to create, delete, and merge branches. Feature branches provide an isolated environment for every change to your codebase. When a developer wants to start working on something, no matter how big or small, they create a new branch. This ensures that the master branch always contains production-quality code.
![]()
Distributed development:
Git gives each developer a local copy of the entire development history, and changes are copied from one such repository to another. These changes are imported as additional development branches, and can be merged in the same way as a locally developed branch.
![]()
Compatibility with existing systems or protocol
Repositories can be published via http, ftp or a Git protocol over either a plain socket, or ssh. Git also has a Concurrent Version Systems (CVS) server emulation, which enables the use of existing CVS clients and IDE plugins to access Git repositories. Apache SubVersion (SVN) and SVK repositories can be used directly with Git-SVN.
What is Git – Role Of Git In DevOps?
Now that you know what is Git, you should know Git is an integral part of DevOps.
DevOps is the practice of bringing agility to the process of development and operations. It’s an entirely new ideology that has swept IT organizations worldwide, boosting project life-cycles and in turn increasing profits. DevOps promotes communication between development engineers and operations, participating together in the entire service life-cycle, from design through the development process to production support.
The diagram below depicts the Devops life cycle and displays how Git fits in Devops.
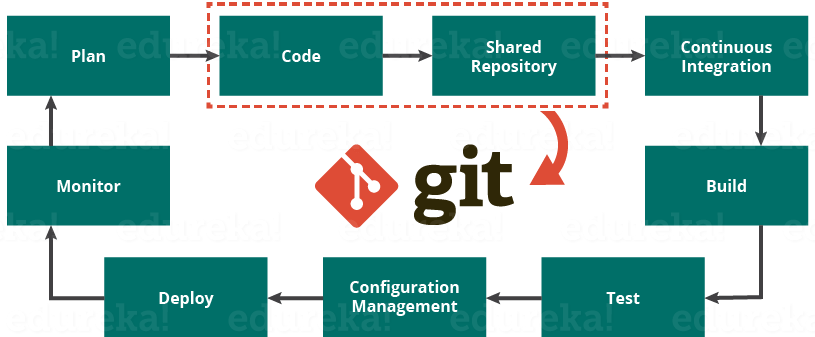
The diagram above shows the entire life cycle of Devops starting from planning the project to its deployment and monitoring. Git plays a vital role when it comes to managing the code that the collaborators contribute to the shared repository. This code is then extracted for performing continuous integration to create a build and test it on the test server and eventually deploy it on the production.
Tools like Git enable communication between the development and the operations team. When you are developing a large project with a huge number of collaborators, it is very important to have communication between the collaborators while making changes in the project. Commit messages in Git play a very important role in communicating among the team. The bits and pieces that we all deploy lies in the Version Control system like Git. To succeed in DevOps, you need to have all of the communication in Version Control. Hence, Git plays a vital role in succeeding at DevOps.
Who uses Git? – Popular Companies Using Git
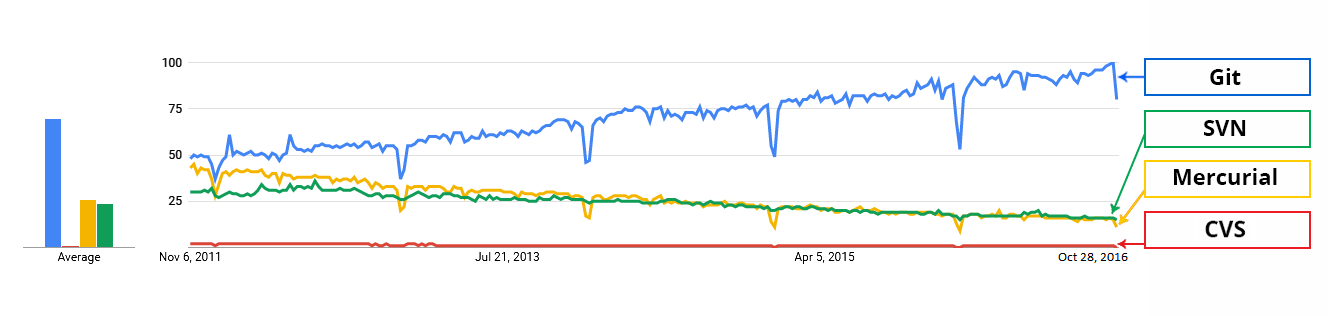
Git has earned way more popularity compared to other version control tools available in the market like Apache Subversion(SVN), Concurrent Version Systems(CVS), Mercurial etc. You can compare the interest of Git by time with other version control tools with the graph collected from Google Trends below:
In large companies, products are generally developed by developers located all around the world. To enable communication among them, Git is the solution.
Some companies that use Git for version control are: Facebook, Yahoo, Zynga, Quora, Twitter, eBay, Salesforce, Microsoft and many more.
Lately, all of Microsoft’s new development work has been in Git features. Microsoft is migrating .NET and many of its open source projects on GitHub which are managed by Git.
One of such projects is the LightGBM. It is a fast, distributed, high performance gradient boosting framework based on decision tree algorithms which is used for ranking, classification and many other machine learning tasks.
How do I see my GIT repository?
To be very clear, a Git repository is the directory where all of your project files and the related metadata resides.
Git records the current state of the project by creating a tree graph from the index. It is usually in the form of a Directed Acyclic Graph (DAG).
Before you go ahead, check out this video on Git tutorial to have better in-sight.
Hands-On
Now that you have understood what Git aims to achieve, let us go ahead with the operations and commands.
How do I learn Git commands?
A basic overview of how Git works:
- Create a “repository” (project) with a git hosting tool (like Github or Bitbucket)
- Copy (or clone) the repository to your local machine
- Add a file to your local repo and “commit” (save) the changes
- “Push” your changes to your master branch
- Make a change to your file with a git hosting tool and commit
- “Pull” the changes to your local machine
- Create a “branch” (version), make a change, commit the change
- Open a “pull request”.
- “Merge” your branch to the master branch
What is the difference between Git Shell and Git Bash?
Git Bash and Git Shell are two different command line programs which allow you to interact with the underlying Git program. Bash is a Linux-based command line while Shell is a native Windows command line.
Git Tutorial – A few Operations & Commands
Some of the basic operations in Git are:
- Initialize
- Add
- Commit
- Pull
- Push
Some advanced Git operations are:
- Branching
- Merging
- Rebasing
Let me first give you a brief idea about how these operations work with the Git repositories. Take a look at the architecture of Git below:
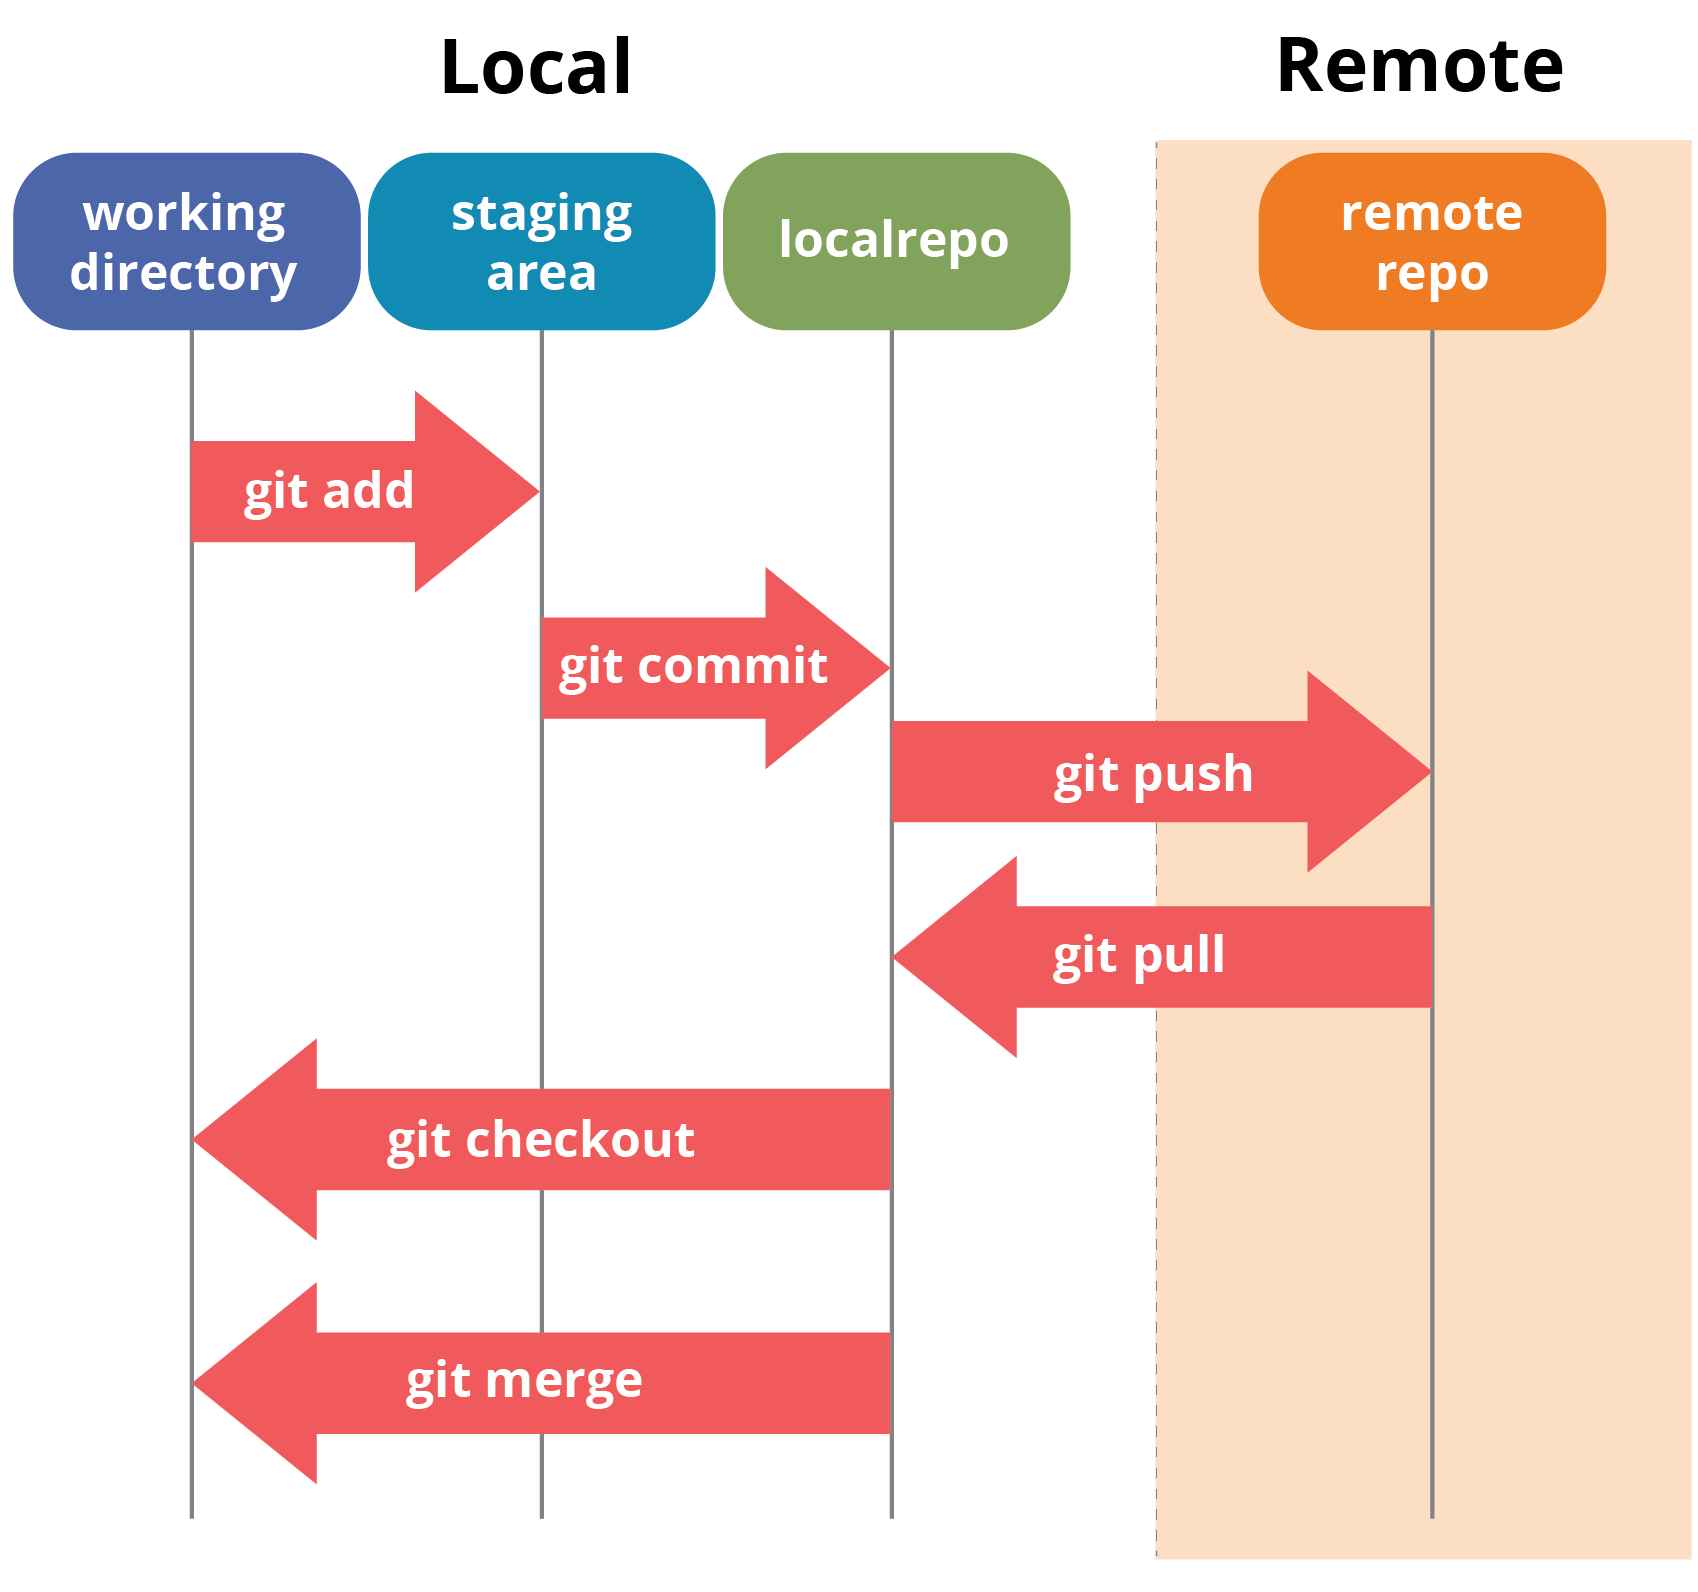
If you understand the above diagram well and good, but if you don’t, you need not worry, I will be explaining these operations in this Git Tutorial one by one. Let us begin with the basic operations.
You need to install Git on your system first. If you need help with the installation, click here.
What is Git Bash used for?
This Git Bash Tutorial focuses on the commands and operations that can be used on Git Bash.
How to create a GitHub Repository?
A repository is a storage space where your project lives. It can be local to a folder on your computer, or it can be a storage space on GitHub or another online host. You can keep code files, text files, images or any kind of a file in a repository. You need a GitHub repository when you have done some changes and are ready to be uploaded. This GitHub repository acts as your remote repository. So let me make your task easy, just follow these simple steps to create a GitHub repository:
- Go to the link: https://github.com/ . Fill the sign up form and click on “Sign up for Github”.
- Click on “Start a new project”.
Refer to the below screenshot to get a better understanding.

- Enter any repository name and click on “Create Repository”. You can also give a description to your repository (optional).
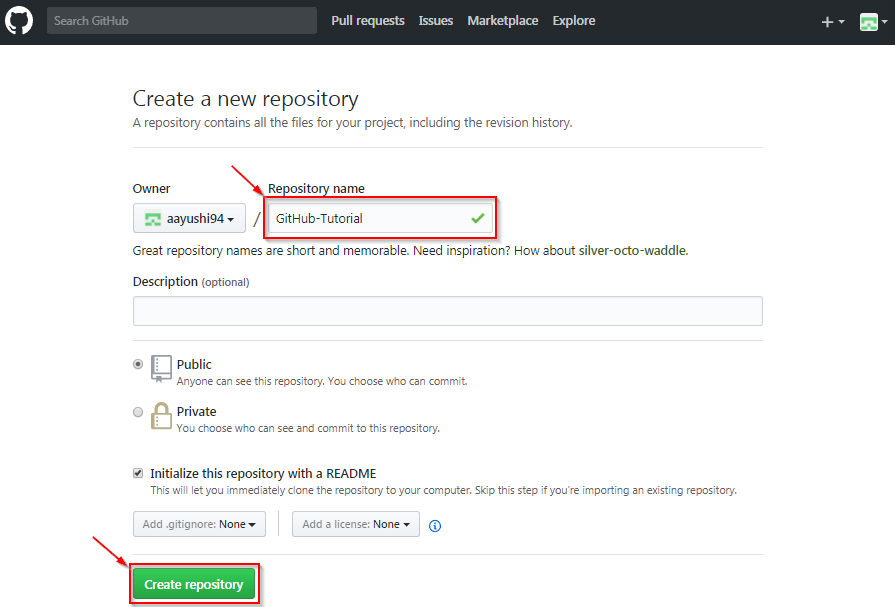
Now, if you noticed by default a GitHub repository is public which means that anyone can view the contents of this repository whereas in a private repository, you can choose who can view the content. Also, private repository is a paid version. Also, if you refer the above screenshot, initialize the repository with a README file. This file contains the description of the file and once you check this box, this will be the first file inside your repository.
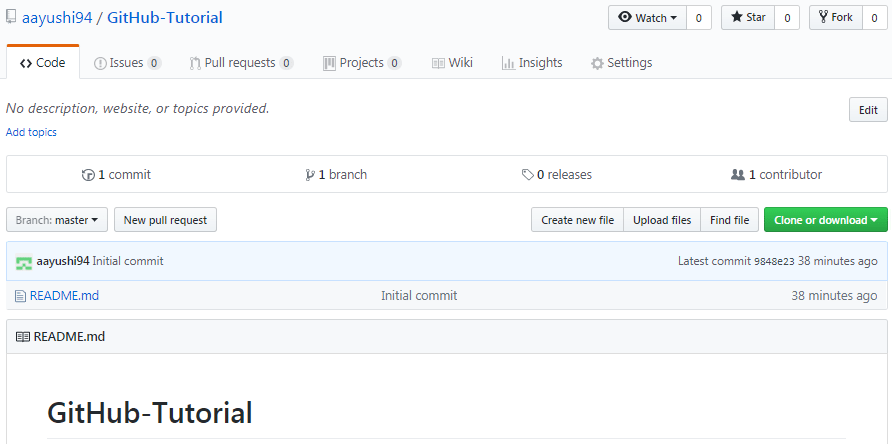 Congratulations, your repository is successfully created! It will look like the below screenshot:
So now my central repository has been sucessfully created! Once this is done, you are ready to commit, pull, push and perform all the other operations. Now let’s move forward and understand branching in GitHub.
Step 3: Create Branches and Perform Operations
Branching: Branches help you to work on different versions of a repository at one time. Let’s say you want to add a new feature (which is in the development phase), and you are afraid at the same time whether to make changes to your main project or not. This is where git branching comes to rescue. Branches allow you to move back and forth between the different states/versions of a project. In the above scenario, you can create a new branch and test the new feature without affecting the main branch. Once you are done with it, you can merge the changes from new branch to the main branch. Here the main branch is the master branch, which is there in your repository by default. Refer to the below image for better understanding:
As depicted in the above image, there is a master/ production branch which has a new branch for testing. Under this branch, two set of changes are done and once it completed, it is merged back to the master branch. So this is how branching works!
Let’s move ahead in ‘how to use GitHub’ blog, and learn how you can create a branch.
To create a branch in GitHub, follow the below steps:
- Click on the dropdown “Branch: master”
- As soon as you click on the branch, you can find an existing branch or you can create a new one. In my case, I am creating a new branch with a name “readme- changes”. Refer to the below screenshot for better understanding.
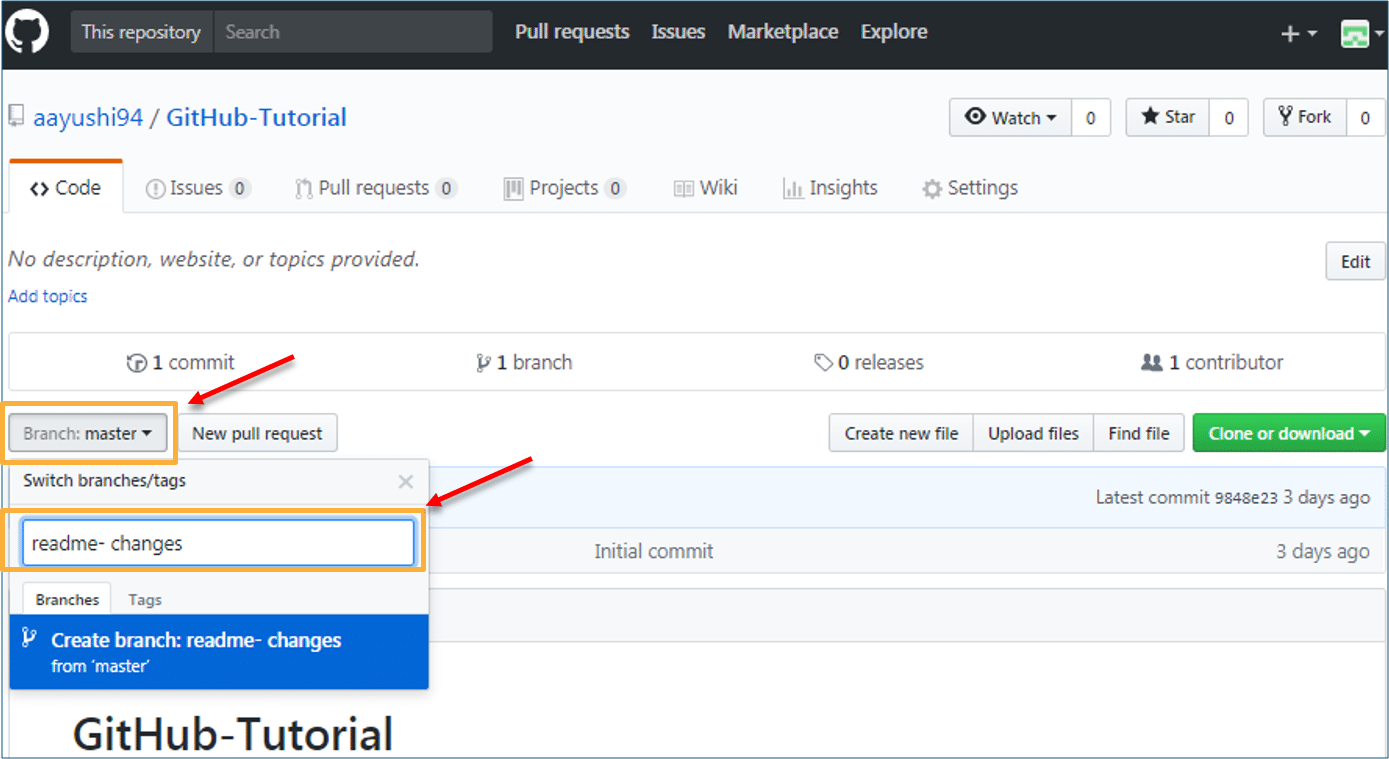
Once you have created a new branch, you have two branches in your repository now i.e. read-me (master branch) and readme- changes. The new branch is just the copy of master branch. So let’s perform some changes in our new branch and make it look different from the master branch.
How to use GitHub: Operations
Commit Command:
This operation helps you to save the changes in your file. When you commit a file, you should always provide the message, just to keep in the mind the changes done by you. Though this message is not compulsory but it is always recommended so that it can differentiate the various versions or commits you have done so far to your repository. These commit messages maintain the history of changes which in turn help other contributors to understand the file better. Now let’s make our first commit, follow the below steps:
- Click on “readme- changes” file which we have just created.
- Click on the “edit” or a pencil icon in the righmost corner of the file.
- Once you click on that, an editor will open where you can type in the changes or anything.
- Write a commit message which identifies your changes.
- Click commit changes in the end.
Refer to the below screenshot for better understanding:

We have successfully made our first commit. Now this “readme- changes” file is different from the master branch. Next, let us see how can we open a pull request
How do I navigate Git Bash?
After installing Git in your Windows system, just open your folder/directory where you want to store all your project files; right click and select ‘Git Bash here’.
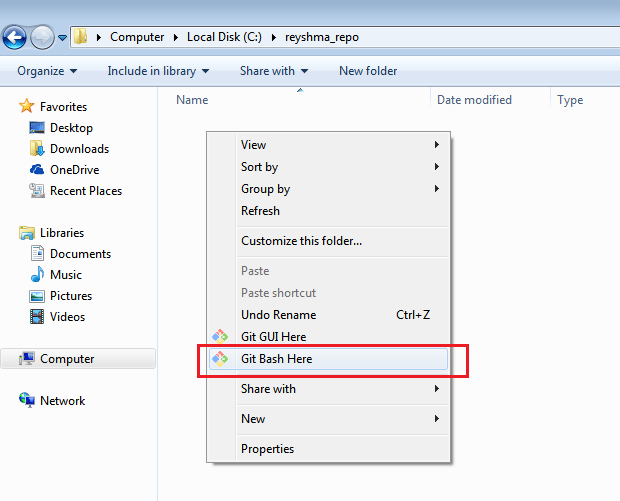
This will open up Git Bash terminal where you can enter commands to perform various Git operations.
Now, the next task is to initialize your repository.
Initialize
In order to do that, we use the command git init. Please refer to the below screenshot.

git init creates an empty Git repository or re-initializes an existing one. It basically creates a .git directory with sub directories and template files. Running a git init in an existing repository will not overwrite things that are already there. It rather picks up the newly added templates.
Now that my repository is initialized, let me create some files in the directory/repository. For e.g. I have created two text files namely edureka1.txt and edureka2.txt.
Let’s see if these files are in my index or not using the command git status. The index holds a snapshot of the content of the working tree/directory, and this snapshot is taken as the contents for the next change to be made in the local repository.
Git status
The git status command lists all the modified files which are ready to be added to the local repository.
Let us type in the command to see what happens:
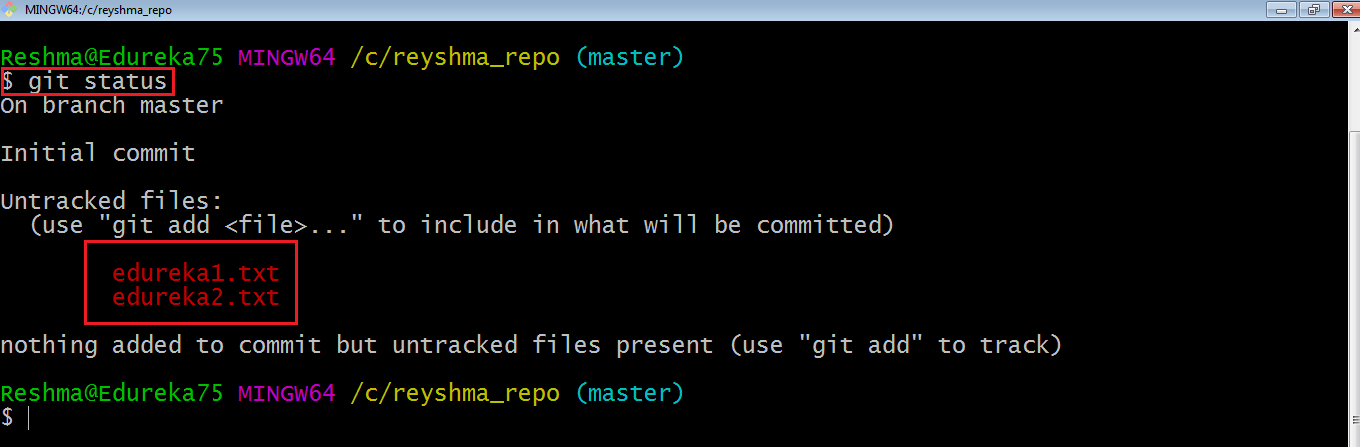
This shows that I have two files which are not added to the index yet. This means I cannot commit changes with these files unless I have added them explicitly in the index.
Add
This command updates the index using the current content found in the working tree and then prepares the content in the staging area for the next commit.
Thus, after making changes to the working tree, and before running the commit command, you must use the add command to add any new or modified files to the index. For that, use the commands below:
git add <directory>
or
git add <file>
Let me demonstrate the git add for you so that you can understand it better.
I have created two more files edureka3.txt and edureka4.txt. Let us add the files using the command git add -A. This command will add all the files to the index which are in the directory but not updated in the index yet.
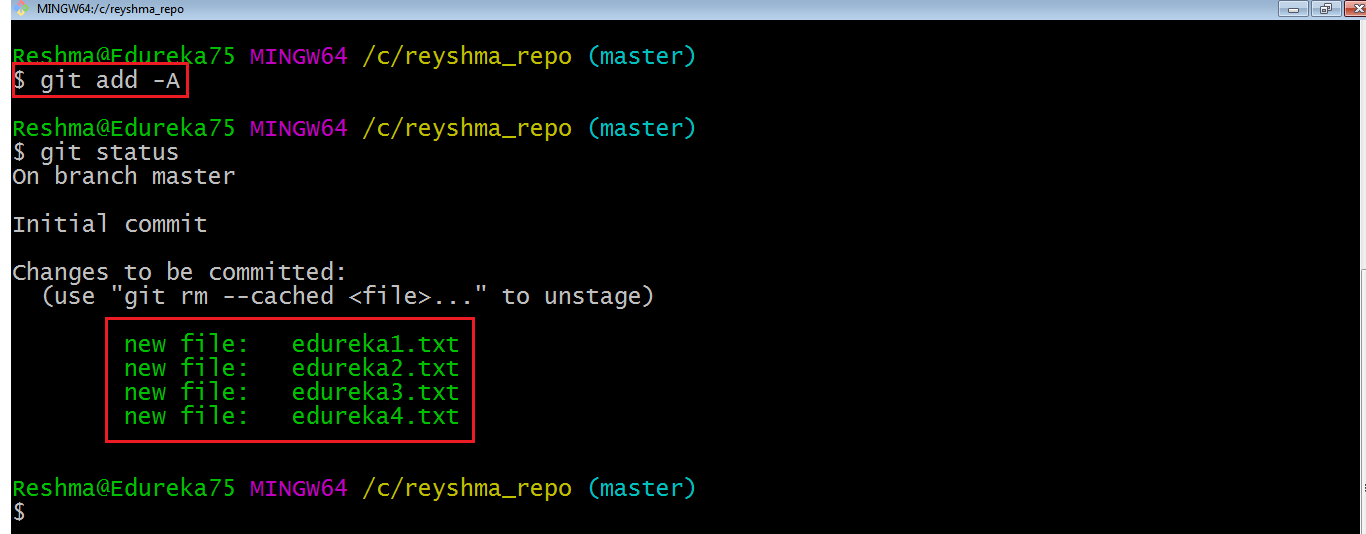
Now that the new files are added to the index, you are ready to commit them.
Commit
It refers to recording snapshots of the repository at a given time. Committed snapshots will never change unless done explicitly. Let me explain how commit works with the diagram below: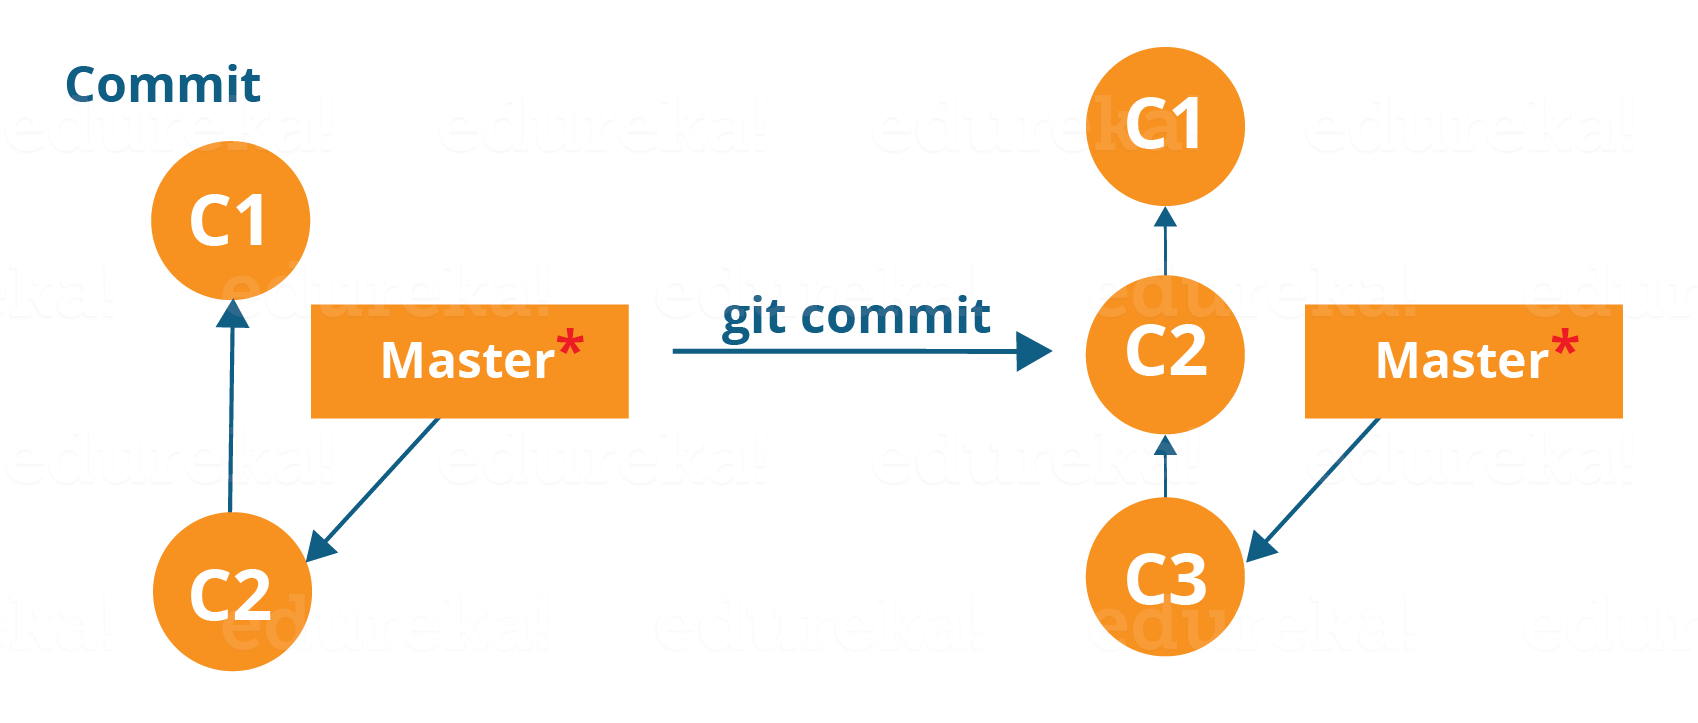
Here, C1 is the initial commit, i.e. the snapshot of the first change from which another snapshot is created with changes named C2. Note that the master points to the latest commit.
Now, when I commit again, another snapshot C3 is created and now the master points to C3 instead of C2.
Git aims to keep commits as lightweight as possible. So, it doesn’t blindly copy the entire directory every time you commit; it includes commit as a set of changes, or “delta” from one version of the repository to the other. In easy words, it only copies the changes made in the repository
git commit
You can commit by using the command below:
This will commit the staged snapshot and will launch a text editor prompting you for a commit message.
Or you can use:
git commit -m “<message>”
Let’s try it out.
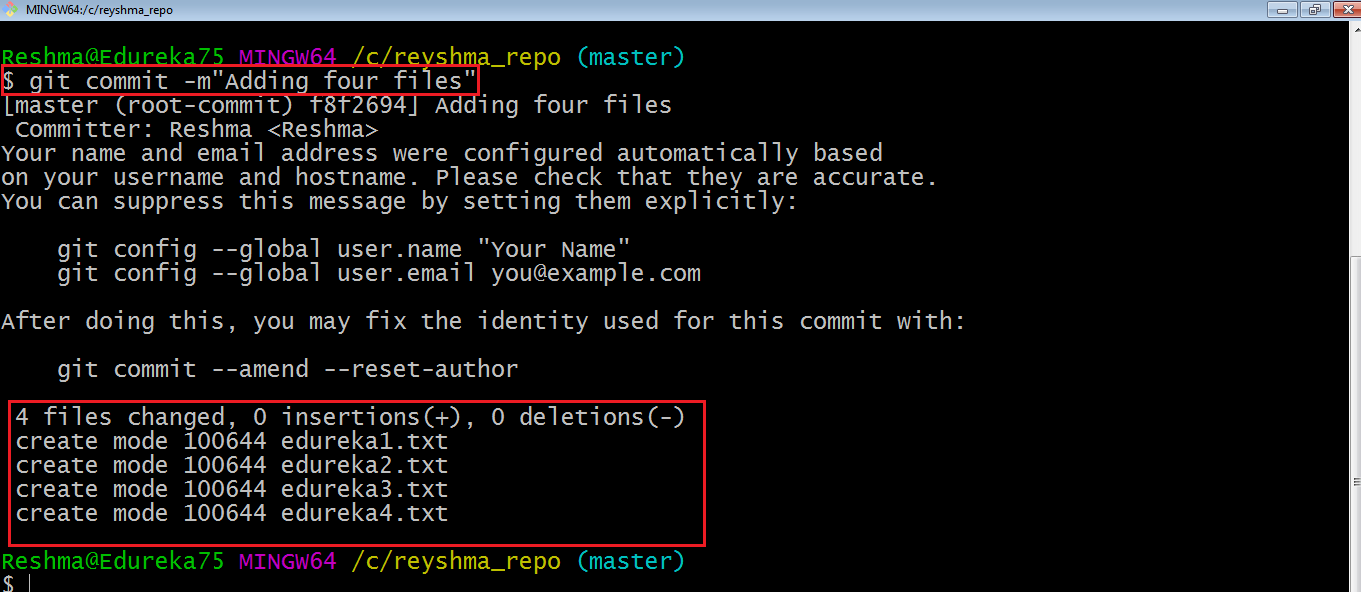
As you can see above, the git commit command has committed the changes in the four files in the local repository.
Now, if you want to commit a snapshot of all the changes in the working directory at once, you can use the command below:
git commit -a
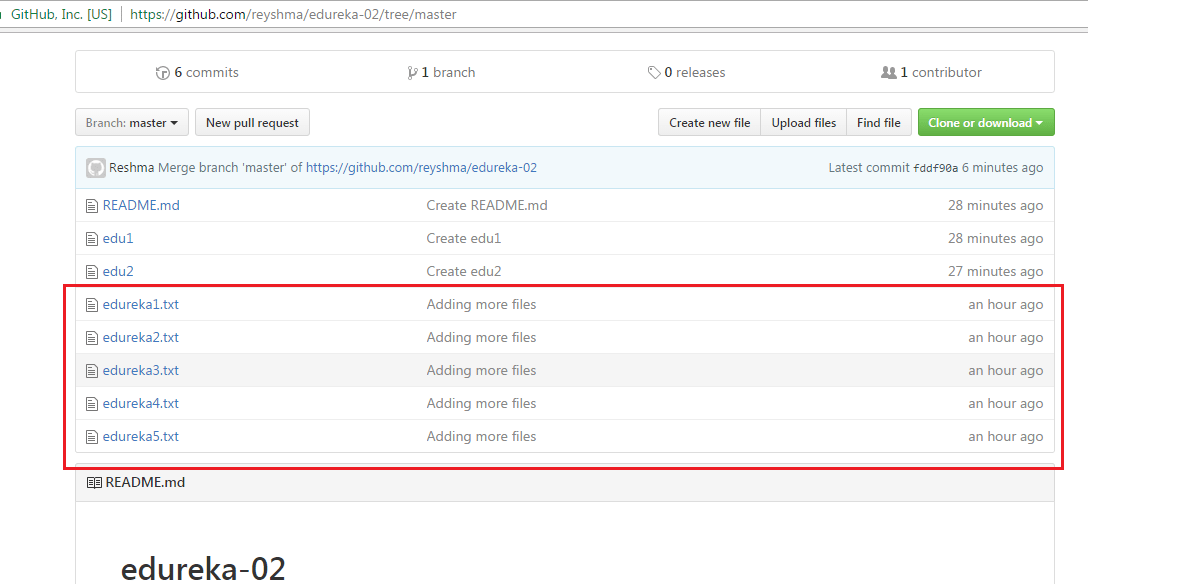
I have created two more text files in my working directory viz. edureka5.txt and edureka6.txt but they are not added to the index yet.
I am adding edureka5.txt using the command:
git add edureka5.txt
I have added edureka5.txt to the index explicitly but not edureka6.txt and made changes in the previous files. I want to commit all changes in the directory at once. Refer to the below snapshot.
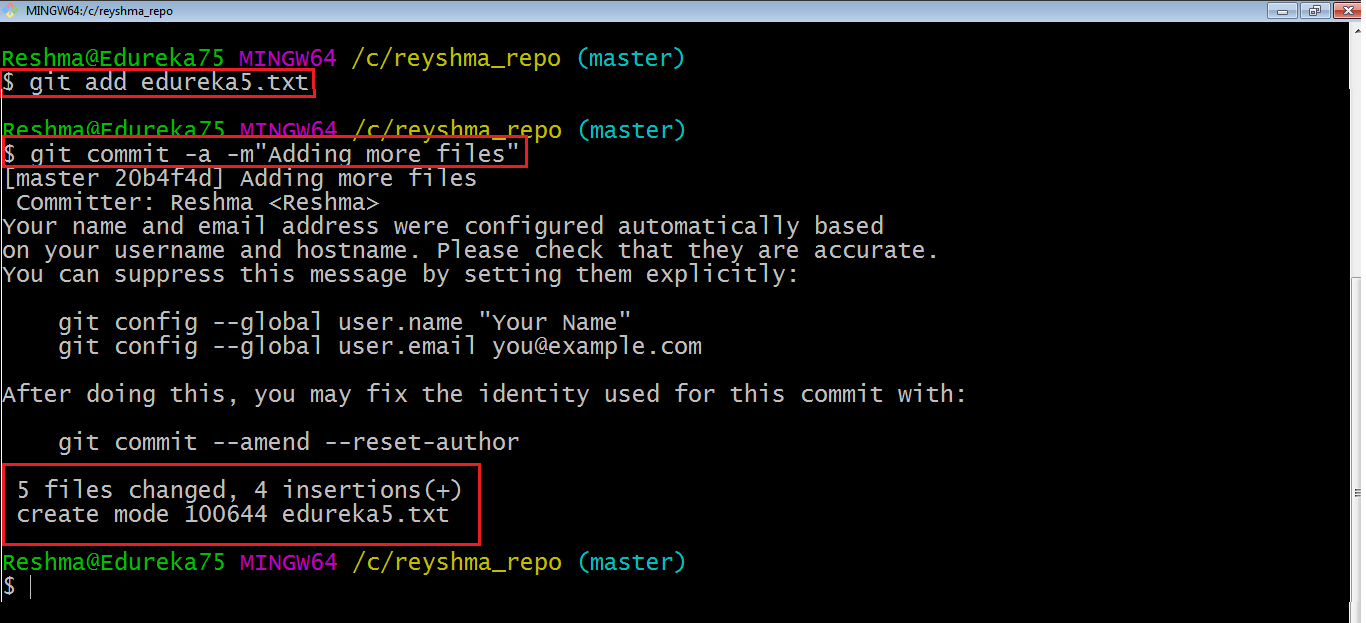
This command will commit a snapshot of all changes in the working directory but only includes modifications to tracked files i.e. the files that have been added with git add at some point in their history. Hence, edureka6.txt was not committed because it was not added to the index yet. But changes in all previous files present in the repository were committed, i.e. edureka1.txt, edureka2.txt, edureka3.txt, edureka4.txt and edureka5.txt.
Now I have made my desired commits in my local repository.
Note that before you affect changes to the central repository you should always pull changes from the central repository to your local repository to get updated with the work of all the collaborators that have been contributing in the central repository. For that we will use the pull command.
Pull
The git pull command fetches changes from a remote repository to a local repository. It merges upstream changes in your local repository, which is a common task in Git based collaborations.
But first, you need to set your central repository as origin using the command:
git remote add origin <link of your central repository>

Now that my origin is set, let us extract files from the origin using pull. For that use the command:
git pull origin main
This command will copy all the files from the master branch of remote repository to your local repository.

Since my local repository was already updated with files from master branch, hence the message is Already up-to-date. Refer to the screen shot above.
Note: One can also try pulling files from a different branch using the following command:
git pull origin <branch-name>
Your local Git repository is now updated with all the recent changes. It is time you make changes in the central repository by using the push command.
Push
This command transfers commits from your local repository to your remote repository. It is the opposite of pull operation.
Pulling imports commits to local repositories whereas pushing exports commits to the remote repositories .
The use of git push is to publish your local changes to a central repository. After you’ve accumulated several local commits and are ready to share them with the rest of the team, you can then push them to the central repository by using the following command:
git push <remote>
Note : This remote refers to the remote repository which had been set before using the pull command.
This pushes the changes from the local repository to the remote repository along with all the necessary commits and internal objects. This creates a local branch in the destination repository.
Let me demonstrate it for you.
The above files are the files which we have already committed previously in the commit section and they are all “push-ready“. I will use the command git push origin master to reflect these files in the master branch of my central repository.
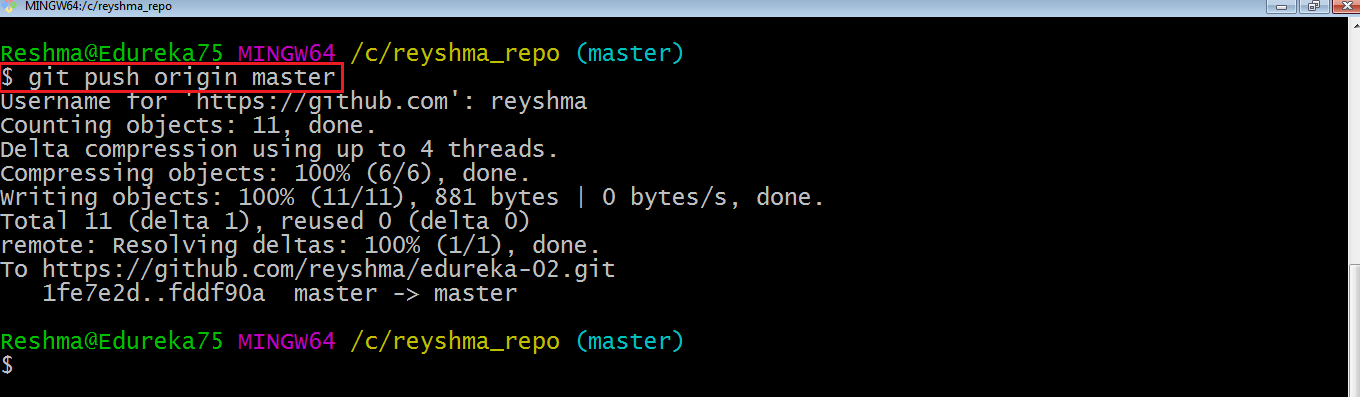
Let us now check if the changes took place in my central repository.
Yes, it did. :-)
To prevent overwriting, Git does not allow push when it results in a non-fast forward merge in the destination repository.
Note: A non-fast forward merge means an upstream merge i.e. merging with ancestor or parent branches from a child branch.
To enable such merge, use the command below:
git push <remote> –force
The above command forces the push operation even if it results in a non-fast forward merge.
At this point of this Git Tutorial, I hope you have understood the basic commands of Git. Now, let’s take a step further to learn branching and merging in Git.
Branching
Branches in Git are nothing but pointers to a specific commit. Git generally prefers to keep its branches as lightweight as possible.
There are basically two types of branches viz. local branches and remote tracking branches.
They link your work from the local repository to the work on central repository.A local branch is just another path of your working tree. On the other hand, remote tracking branches have special purposes. Some of them are:
- They automatically detect which remote branches to get changes from, when you use git pull.
You can check what your current branch is by using the command:
git branch
The one mantra that you should always be chanting while branching is “branch early, and branch often”
To create a new branch we use the following command:
git branch <branch-name>
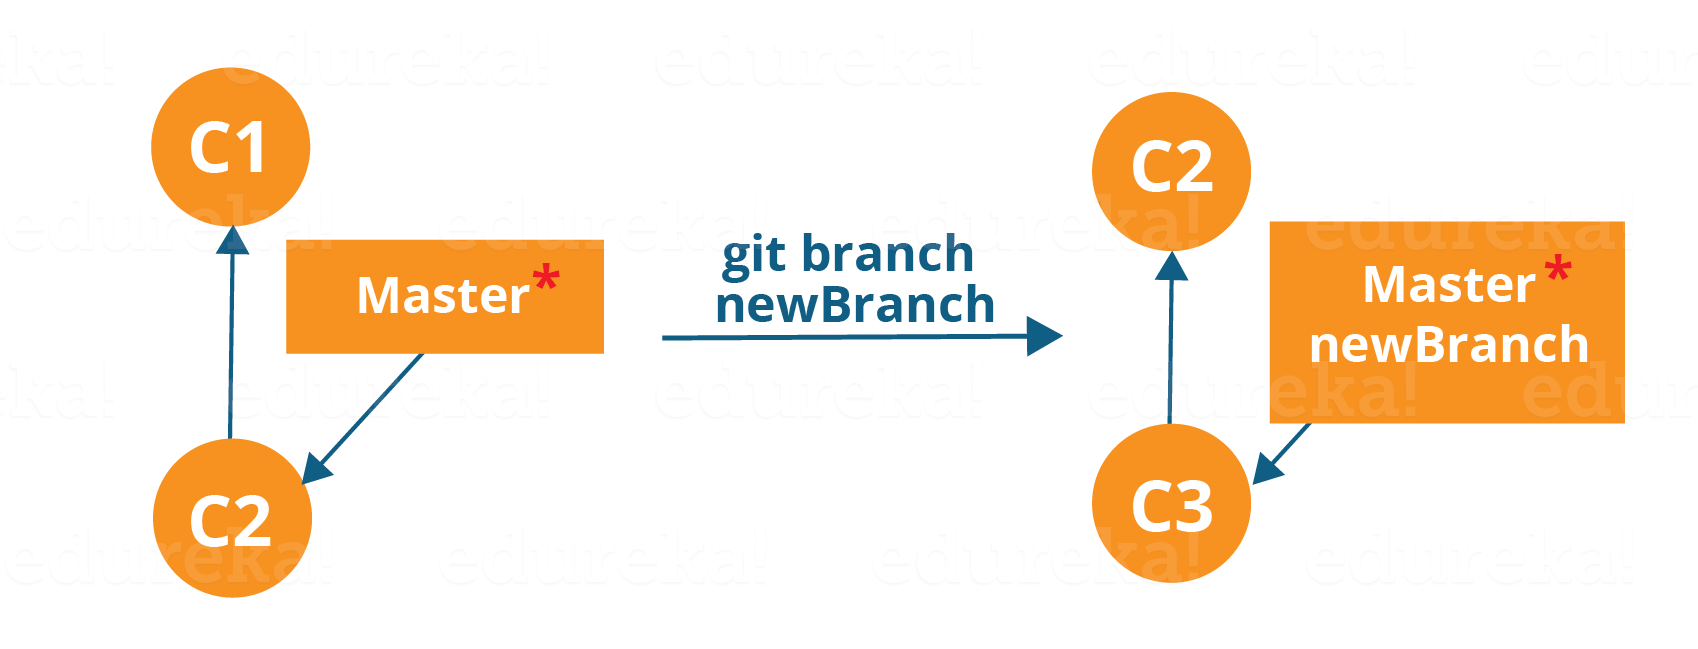
The diagram above shows the workflow when a new branch is created. When we create a new branch it originates from the master branch itself.
Since there is no storage/memory overhead with making many branches, it is easier to logically divide up your work rather than have big chunky branches.
Now, let us see how to commit using branches.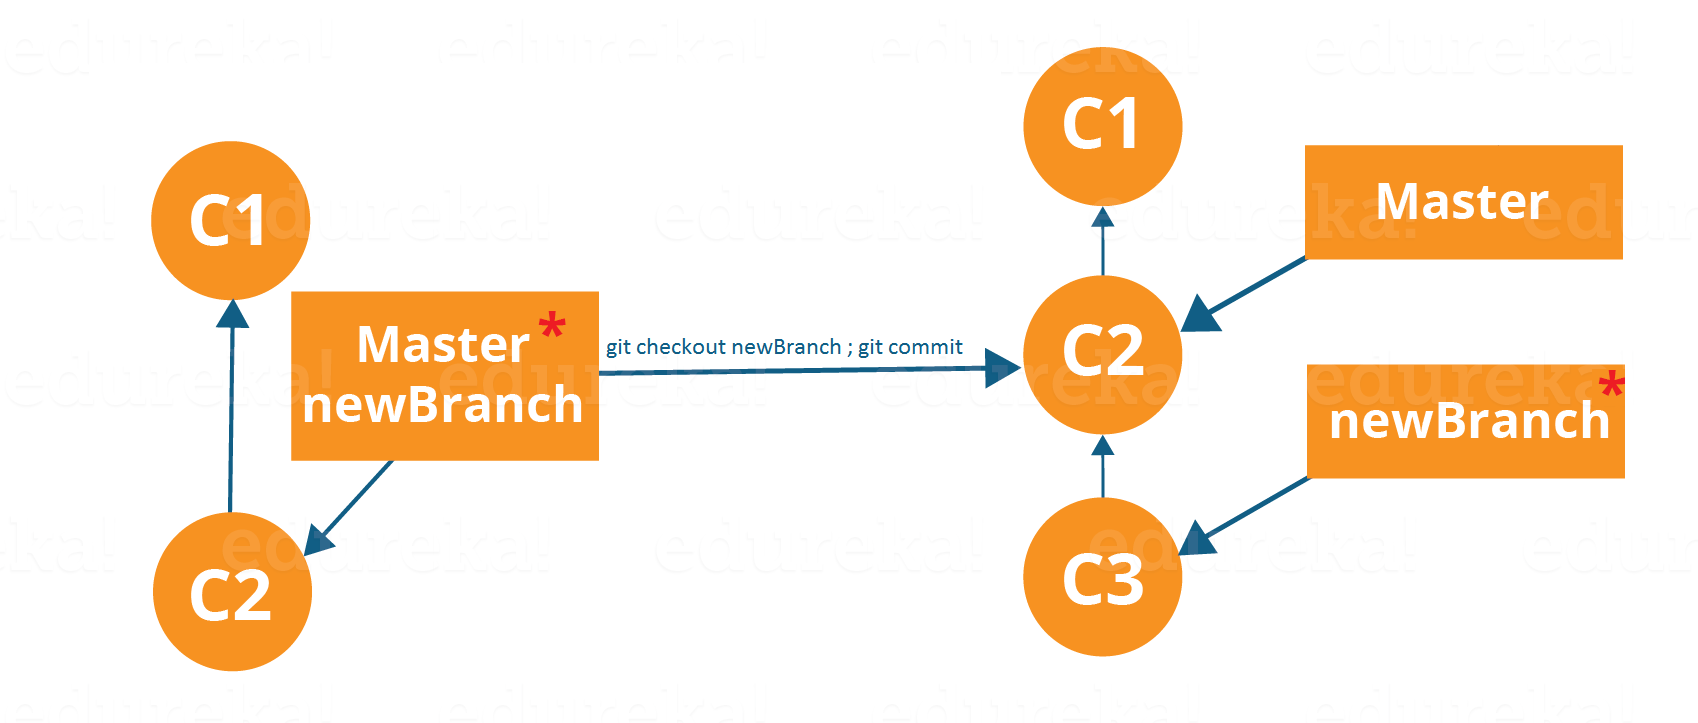
Branching includes the work of a particular commit along with all parent commits. As you can see in the diagram above, the newBranch has detached itself from the master and hence will create a different path.
Use the command below:
git checkout <branch_name> and then
git commit
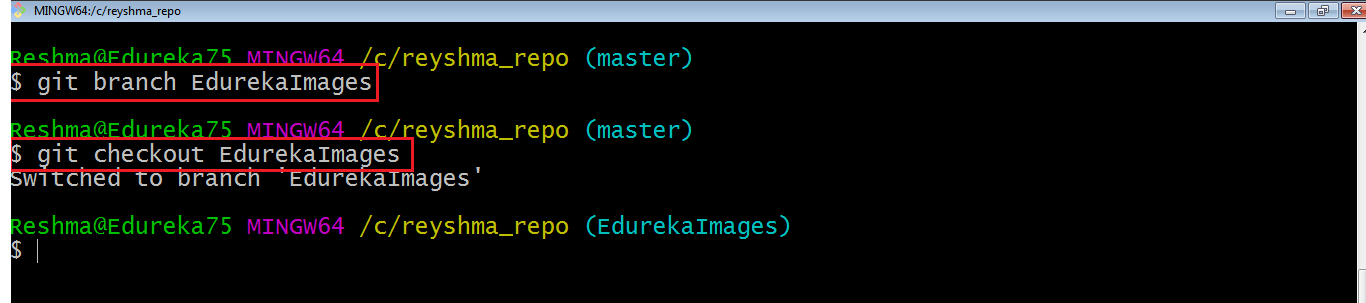
Here, I have created a new branch named “EdurekaImages” and switched on to the new branch using the command git checkout .
One shortcut to the above commands is:
git checkout -b[ branch_name]
This command will create a new branch and checkout the new branch at the same time.
Now while we are in the branch EdurekaImages, add and commit the text file edureka6.txt using the following commands:
git add edureka6.txt
git commit -m”adding edureka6.txt”
Merging
Merging is the way to combine the work of different branches together. This will allow us to branch off, develop a new feature, and then combine it back in.
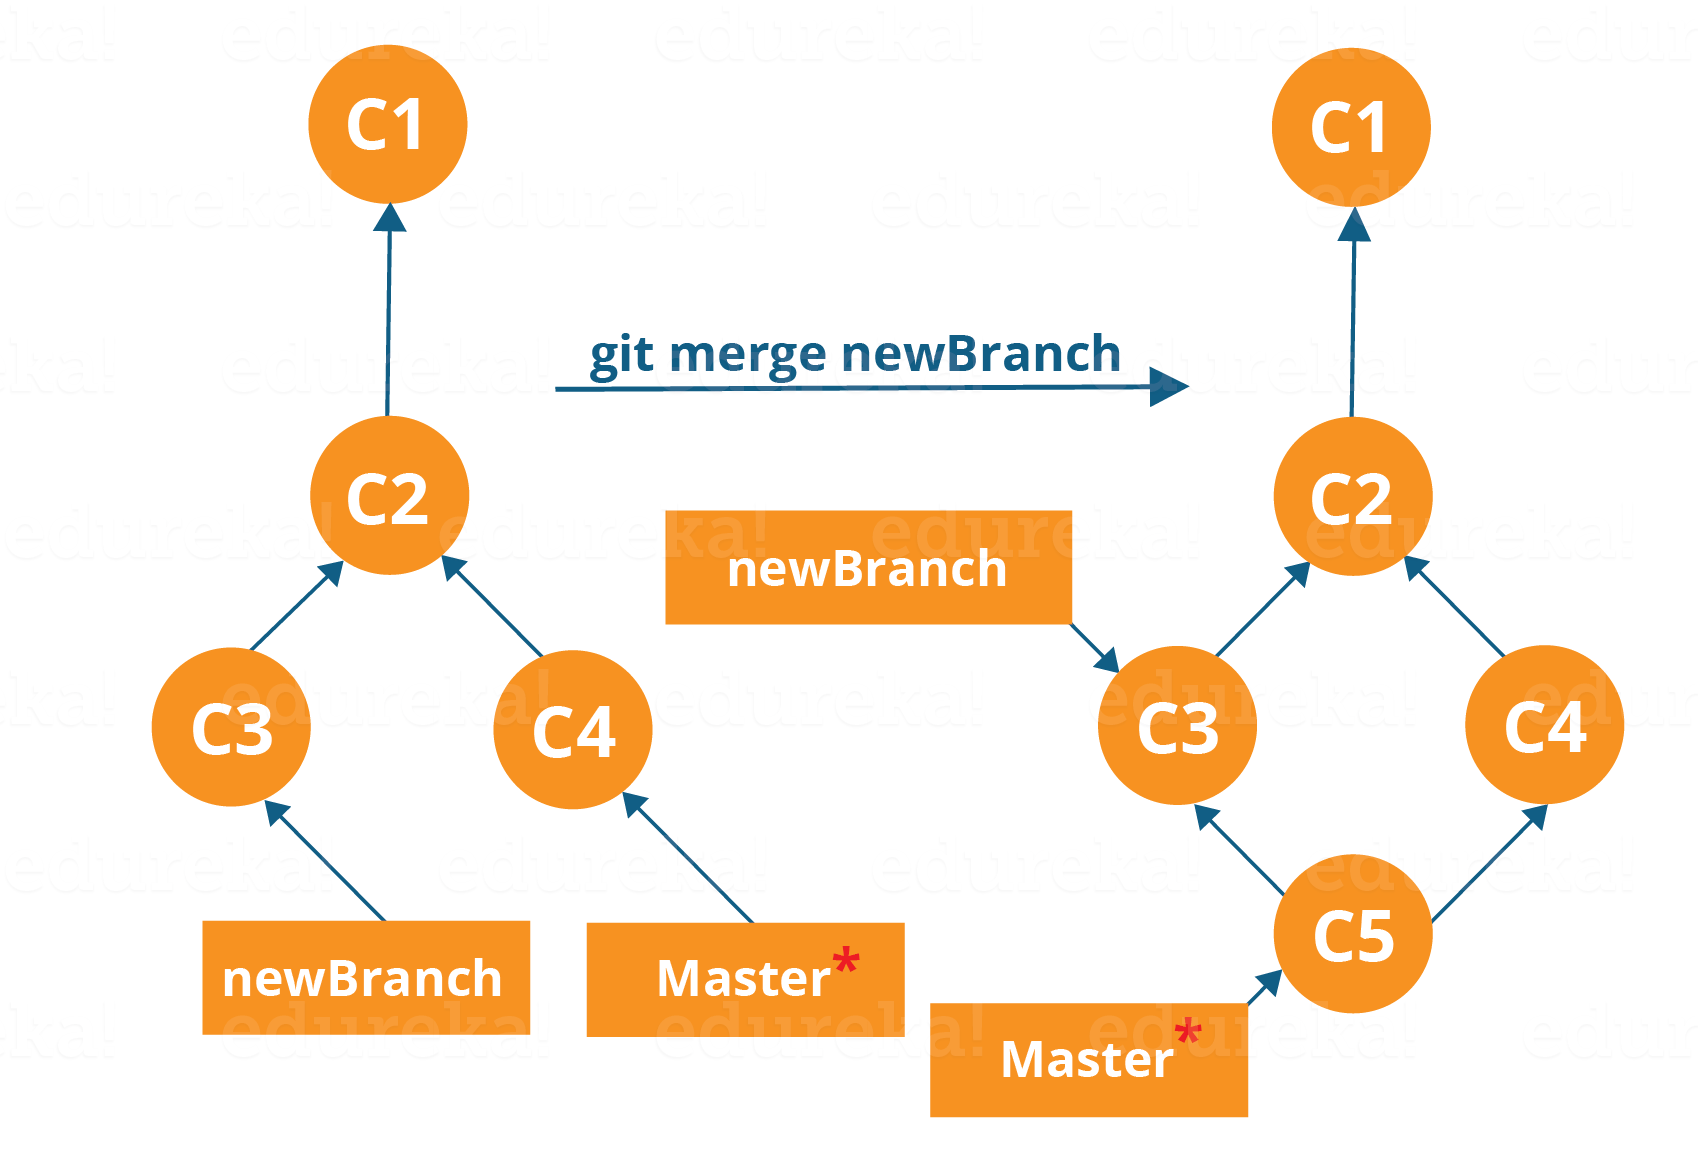
The diagram above shows us two different branches-> newBranch and master. Now, when we merge the work of newBranch into master, it creates a new commit which contains all the work of master and newBranch.
Now let us merge the two branches with the command below:
git merge <branch_name>
It is important to know that the branch name in the above command should be the branch you want to merge into the branch you are currently checking out. So, make sure that you are checked out in the destination branch.
Now, let us merge all of the work of the branch EdurekaImages into the master branch. For that I will first checkout the master branch with the command git checkout master and merge EdurekaImages with the command git merge EdurekaImages

As you can see above, all the data from the branch name are merged to the master branch. Now, the text file edureka6.txt has been added to the master branch.
Merging in Git creates a special commit that has two unique parents.
Rebasing
This is also a way of combining the work between different branches. Rebasing takes a set of commits, copies them and stores them outside your repository.
The advantage of rebasing is that it can be used to make linear sequence of commits. The commit log or history of the repository stays clean if rebasing is done.
Let us see how it happens.
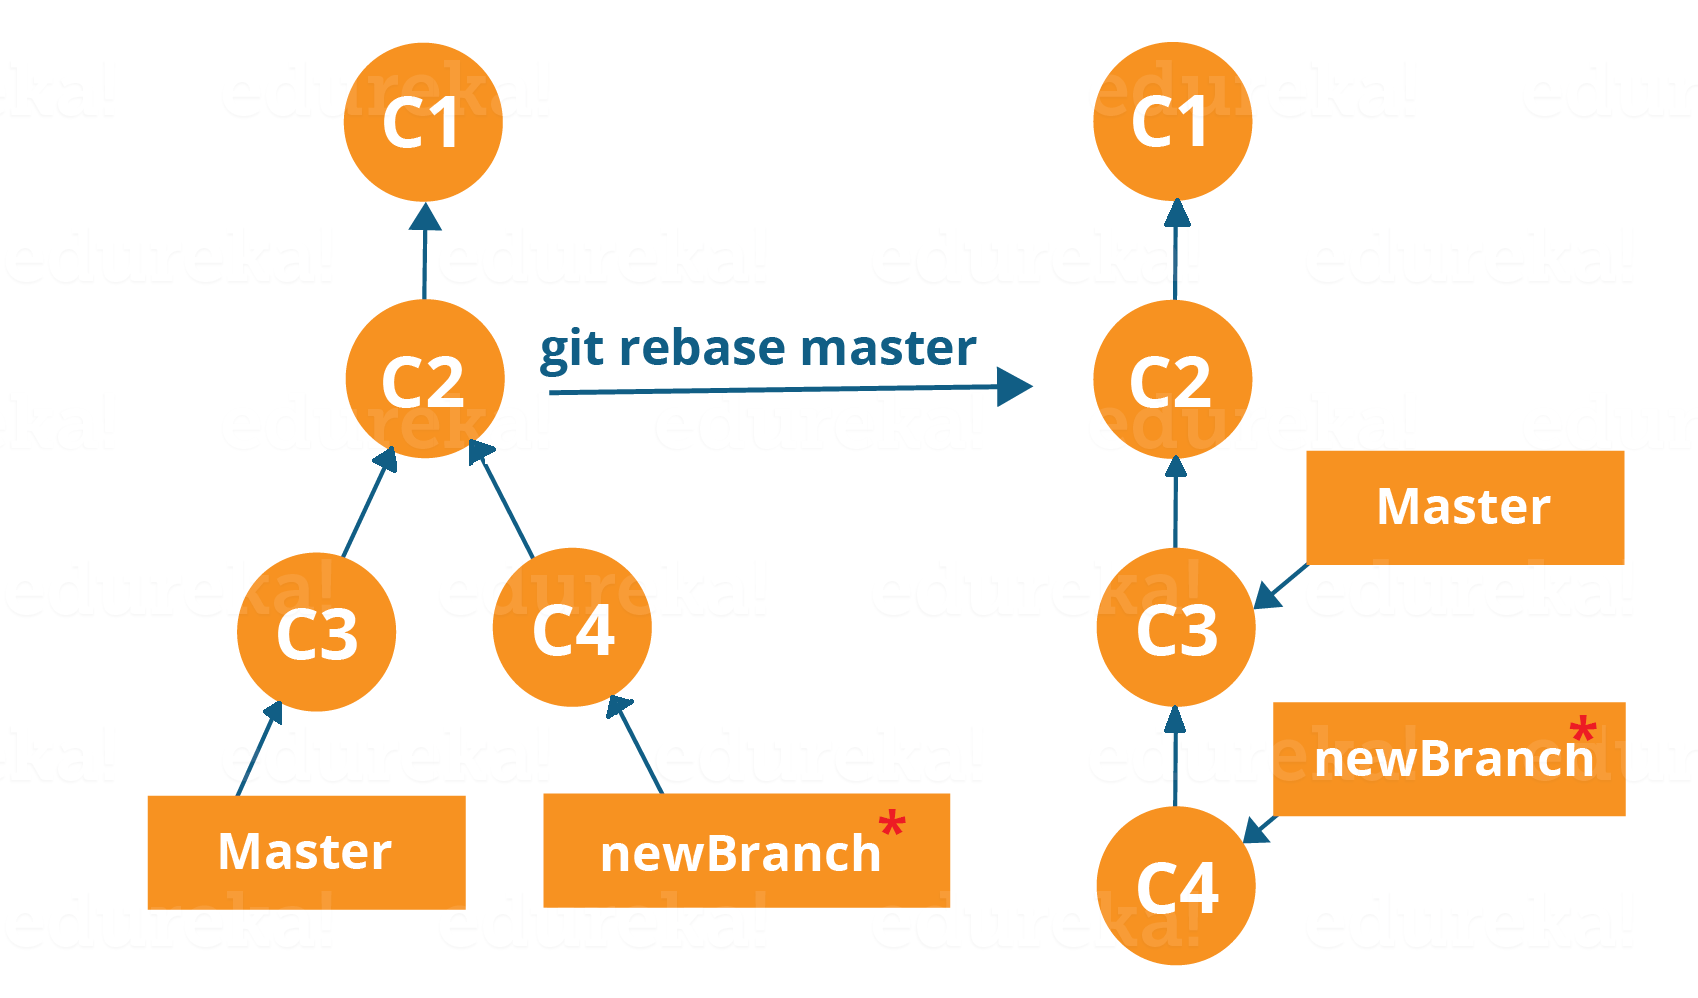
Now, our work from newBranch is placed right after master and we have a nice linear sequence of commits.
Note: Rebasing also prevents upstream merges, meaning you cannot place master right after newBranch.
Now, to rebase master, type the command below in your Git Bash:
git rebase master

This command will move all our work from current branch to the master. They look like as if they are developed sequentially, but they are developed parallelly.
Note that this creates only a single snapshot omitting version control completely. This comes in handy when you want to send the files to a client for review who doesn’t have Git installed in their computer.
- Bundle your repository
It turns a repository into a single file.
Use the following command-
git bundle create ../repo.bundler master
This pushes the master branch to a remote branch, only contained in a file instead of a repository.
An alternate way to do it is:
cd..
git clone repo.bundle repo-copy -b master
cd repo-copy
git log
cd.. /my-git-repo
- Stash uncommitted changes
When we want to undo adding a feature or any kind of added data temporarily, we can “stash” them temporarily.
Use the command below:
git status
git stash
git status
And when you want to re-apply the changes you “stash”ed ,use the command below:
git stash apply


No comments:
Post a Comment