Module 10: Understanding Kubernetes & EKS Set-up
Overview
Kubernetes (also known as k8s ) is an open source container orchestration platform that automates many of the manual processes involved in deploying, managing, and scaling containerized applications
What are Kubernetes clusters?
You can cluster together groups of hosts running Linux® containers, and Kubernetes helps you easily and efficiently manage those clusters.
Kubernetes clusters can span hosts across on-premise, public, private, or hybrid clouds. For this reason, Kubernetes is an ideal platform for hosting cloud-native applications that require rapid scaling, like real-time data streaming through Apache Kafka.
The architecture of kubernetes(Master/Worker Node)

API server – is the primary management components of kubernetes and is responsible for orchestrating all operations (scaling, updates, and so on) in the cluster. It also acts as the gateway to the cluster, so the API server must be accessible by clients from outside the cluster integration with CLI and GUI.
Controller-manager - The Controller Manager is the engine that runs the core control loops, create Pods, watches the state of the cluster, and makes changes to drive status toward the desired state.
Replication-Controller - A ReplicationController ensures that a specified number of pod replicas are running at any one time. It makes sure that a pod is always up and available. Node Controller - The node controller is a Kubernetes master component which manages various aspects of nodes.
Scheduler - is identify the right node to place a container on based resource limitations or guarantees, taints, tolerations and affinity/anti-affinity roles.
etcd cluster - etcd is a critical part of the Kubernetes. etcd database that stores the state of the cluster, including node and workload information in a key/value format. Add-ons:
DNS: all Kubernetes clusters should have cluster DNS to resolve name of the containers inside master node as all the above components is containers inside master node
Web UI: web-based UI for Kubernetes clusters. It allows users to manage and troubleshoot applications running in the cluster, as well as the cluster itself.
Container runtime: The container runtime is the software that is responsible for running containers. Kubernetes supports several container runtimes: Docker , containerd , CRI-O Node (worker) components Below are the main components on a (worker) node:
kubelet - the main service on a node, connect between Master and Node and ensuring that pods and their containers are healthy and running in the desired state. This component also reports to the master on the health of the host where it is running.
kube-proxy - a proxy service that runs on each worker node to deal with individual host subnetting and expose services to the external world. It performs request forwarding to the correct pods/containers across the various isolated networks in a cluster. Kubectl kubectl command is a line tool that interacts with kube-apiserver and send commands to the master node. Each command is converted into an API call.
Hands-On
Installation of Managed Kubernetes Cluster ( Elastic Kubernets Service- EKS)
What is Amazon EKS
Amazon EKS is a fully managed container orchestration service. EKS allows you to quickly deploy a production ready Kubernetes cluster in AWS, deploy and manage containerized applications more easily with a fully managed Kubernetes service.

EKS takes care of master node/control plane. We need to create worker nodes.
Pre-requistes:
This Lab EC2 instance needs to have following configured:
Install AWS CLI – Command line tools for working with AWS services, including Amazon EKS.
Install eksctl – A command line tool for working with EKS clusters that automates many individual tasks.
Install kubectl – A command line tool for working with Kubernetes clusters.
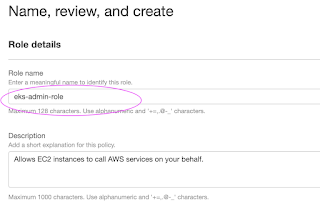
Create IAM Role with Administrator Access


Now search for
Skip on create tag.
Now give a role name and create it.
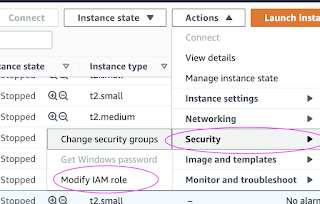
Go to AWS console, click on EC2, select EC2 instance, Choose Security.
Click on Modify IAM Role
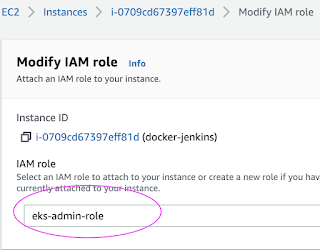
Choose the role you have created from the dropdown.
Select the role and click on Apply.

$curl -O https://bootstrap.pypa.io/get-pip.py$ yum install python3-pip$ ls -a ~export PATH=~/.local/bin:$PATHsource ~/.bash_profilepip3AWS CLI
pip3 install awscli --upgrade --user
aws --version
aws configure
ENTER: Your Region Eg(us-east-1) Format: json
eksctl
curl --silent --location "https://github.com/weaveworks/eksctl/releases/latest/download/eksctl_$(uname -s)_amd64.tar.gz" | tar xz -C /tmp
sudo mv /tmp/eksctl /usr/local/bin
eksctl version
If you get something like "no command found" enter the below command
cp /usr/local/bin/eksctl /usr/bin -rf
kubectl
curl -o kubectl https://amazon-eks.s3-us-west-2.amazonaws.com/1.14.6/2019-08-22/bin/linux/amd64/kubectl
chmod +x ./kubectl
mkdir -p $HOME/bin && cp ./kubectl $HOME/bin/kubectl && export PATH=$HOME/bin:$PATH
kubectl version --short --client
5) aws-iam-authenticator
curl -o aws-iam-authenticator https://amazon-eks.s3-us-west-2.amazonaws.com/1.14.6/2019-08-22/bin/linux/amd64/aws-iam-authenticator
chmod +x ./aws-iam-authenticator
mkdir -p $HOME/bin && cp ./aws-iam-authenticator $HOME/bin/aws-iam-authenticator && export PATH=$PATH:$HOME/bin
echo 'export PATH=$PATH:$HOME/bin' >> ~/.bashrc
aws-iam-authenticator help
Cluster creation
eksctl create cluster --name EKSDemo003 --version 1.18 --region us-east-2 --nodegroup-name standard-workers --node-type t2.medium --nodes 3 --nodes-min 1 --nodes-max 3 --managed
Delete the cluster
eksctl delete cluster --region us-east-2 --name EKSDemo003
it will take around 10-15 minutes for the cluster
Validate the cluster by the follow command
kubectl get nodes

Deploying Nginx pods on KubernetesDeploying Nginx Container
kubectl run sample-nginx --image=nginx --replicas=2 --port=80
kubectl get pods
kubectl get deployments
Expose the deployment as service. This will create an ELB in front of those 2 containers and allow us to publicly access them.
kubectl expose deployment sample-nginx --port=80 --type=LoadBalancer
kubectl get services -o wide


copy the loadbalancer into your Brower to access the nginx application
 let's try to deploy Application on the cluster using deployment and service yaml fileThe command to create deployment and servicekubectl create -f filenamevi DemoApp01.yml and copy and paste the belowapiVersion: apps/v1kind: Deploymentmetadata:name: deploy1labels:app: app-v1spec:replicas: 3selector:matchLabels:app: app-v1template:metadata:labels:app: app-v1spec:affinity:nodeAffinity:requiredDuringSchedulingIgnoredDuringExecution:nodeSelectorTerms:- matchExpressions:- key: beta.kubernetes.io/archoperator: Invalues:- amd64- arm64containers:- name: deploy-imagesimage: kellyamadin/d-imags:v1ports:- containerPort: 8080Create service file by below commandvi ServiceApp01.ymlapiVersion: v1kind: Servicemetadata:name: svc1labels:app: app-v1spec:ports:- port: 8080nodePort: 32000protocol: TCPselector:app: app-v1type: NodePort
 copy the public cluster ip and with the port being expose in the SG(32000) and paste in the browse
You can change type from NodePort to LoadBalancer by below service fileapiVersion: v1kind: Service
metadata:
name: svc1
labels:
app: app-v1
spec:
ports:
- port: 8080
nodePort: 32000
protocol: TCP
selector:
app: app-v1
type: LoadBalancer
Rollout and Rollback on Kubernetes by using the below commandFirst open the deployment file and change the version of the image to your desire one and execute the belowkubectl apply -f DemoApp01.yml --recordkubectl rollout status deployment deploy1kubectl get rs kubectl describe deploy deploy1
 Rollback commandkubectl rollout undo deployment deploy1 --to-revision=1kubectl get rs
Blue/Green Deployment
Blue/green deployment is a continuous deployment process that reduces downtime and risk by having two identical production environments, called blue and green.
vi DemoApp02.yml
apiVersion: apps/v1kind: Deploymentmetadata:name: deploy2labels:app: app-v2spec:replicas: 3selector:matchLabels:app: app-v2template:metadata:labels:app: app-v2spec:affinity:nodeAffinity:requiredDuringSchedulingIgnoredDuringExecution:nodeSelectorTerms:- matchExpressions:- key: beta.kubernetes.io/archoperator: Invalues:- amd64- arm64containers:- name: deploy-imagesimage: kellyamaploy-images:v2ports:- containerPort: 8080vi ServiceApp02.ymlapiVersion: v1kind: Servicemetadata:name: svc2labels:app: app-v2spec:ports:- port: 8080nodePort: 32600protocol: TCPselector:app: app-v2type: NodePort copy the public cluster ip and with the port being expose in the SG(32600) and paste in the browse
 flip the service file ( vi ServiceApp01.yml) and change the app-v1 to app-v2 and apply the belowkubectl apply -f ServiceApp01.yml

Afterwhich you will delete second service file and first deployment file ( deploy1 and svc2)kubectl delete svc svc2kubectl delete deployment deploy1


No comments:
Post a Comment